
175 lines
7.6 KiB
Markdown
175 lines
7.6 KiB
Markdown
There are a few services you'll need **_(all free)_** in order to run the development server and access the app locally. Here are the instructions for getting them:
|
|
|
|
# Algolia
|
|
|
|
Choose OAuth or Email Sign Up
|
|
|
|
## Algolia: OAuth Sign Up
|
|
|
|
1. [Click this link and sign up for an account with either GitHub or Google.](https://www.algolia.com/users/sign_up)
|
|

|
|
2. Select your region, and then hit "Let's get started!"
|
|

|
|
3. Skip the tutorial (or don't) and go to your dashboard.
|
|

|
|
4. Click "Go to your dashboard".
|
|
|
|

|
|
|
|
5. Agree to Terms and Conditions.
|
|

|
|
|
|
6. Click "API Keys" on the left navbar.
|
|
|
|

|
|
|
|
7. Change your keys accordingly (name of Algolia key -> name of our application key):
|
|
|
|
```
|
|
Application ID -> ALGOLIASEARCH_APPLICATION_ID
|
|
Search-Only API Key -> ALGOLIASEARCH_SEARCH_ONLY_KEY
|
|
Admin API KEY -> ALGOLIASEARCH_API_KEY
|
|
```
|
|
|
|

|
|
|
|
8. Done!
|
|
|
|
---
|
|
|
|
---
|
|
|
|
---
|
|
|
|
## Algolia Email Sign Up
|
|
|
|
1. [Click this link and sign up for an account with your email address.](https://www.algolia.com/users/sign_up)
|
|

|
|
|
|
2. Fill out your name and what describes you the most.
|
|

|
|
|
|
3. Choose your datacenter/region closest to you.
|
|

|
|
|
|
4. Skip the step asking about your project.
|
|

|
|
|
|
5. Complete the onboarding flow and click "Go to dashboard".
|
|

|
|
|
|
6. Click "API Keys" on the left navbar.
|
|
|
|

|
|
|
|
7. Change your keys accordingly (name of Algolia key -> name of our application key):
|
|
|
|
```
|
|
Application ID -> ALGOLIASEARCH_APPLICATION_ID
|
|
Search-Only API Key -> ALGOLIASEARCH_SEARCH_ONLY_KEY
|
|
Admin API KEY -> ALGOLIASEARCH_API_KEY
|
|
```
|
|
|
|

|
|
|
|
8. Done!
|
|
|
|
That's it! You should try logging in with development, it should work. If it doesn't, let us know via an issue or in the contributors channel!
|
|
|
|
### _The following are optional, but are probably things you'll run into. That said, if you're working on tests and other things, you shouldn't need these._
|
|
|
|
### For authentication, you can choose Twitter, GitHub, or both.
|
|
|
|
# Twitter App
|
|
|
|
1. [Click this link and sign in/sign up for a Twitter account.](https://apps.twitter.com) Note that your Twitter account will need a phone number linked to it in order to create an app.
|
|
2. Create a new app, and fill out the form, like the following example image: 
|
|
|
|
The only important field is the "Callback URL" `http://localhost:3000/users/auth/twitter/callback`, which redirects you properly to `localhost:3000` when signing in.
|
|
|
|
3. Once done, go to your app's settings, and fill in the terms of service `http://dev.to/terms` and privacy policy URL `http://dev.to/privacy`:
|
|
|
|

|
|
|
|
4. Once done, go to your app's permissions, and check the "Request email addresses from users" box.
|
|

|
|
|
|
5. Change your keys accordingly: (name of Twitter key -> name of our application key):
|
|
|
|
```
|
|
Access Token -> TWITTER_KEY
|
|
Access Token Secret -> TWITTER_SECRET
|
|
```
|
|
|
|
6. Done!
|
|
|
|
# GitHub
|
|
|
|
1. [Click this link and sign in/sign up for a GitHub account.](https://github.com/settings/applications/new)
|
|
2. Once signed in, create a new OAuth app. Here's an example; the URLs must match the example:
|
|

|
|
3. Change your keys accordingly; (name of GitHub key -> name of our application key):
|
|
|
|
```
|
|
Client ID -> GITHUB_KEY
|
|
Client Secret -> GITHUB_SECRET
|
|
```
|
|
|
|
4. Done!
|
|
|
|
# Stream
|
|
|
|
1. [Sign up for an account with this link](https://getstream.io/accounts/signup/), using either your email or GitHub.
|
|
|
|

|
|
|
|
2. Click "View Dashboard" at the top right corner.
|
|
|
|

|
|
|
|
3. **In the next page, click "Add New Feed Group".**
|
|
|
|

|
|
|
|
<hr>
|
|
|
|
4. Add a new feed group with the type "Notification" and name it `notifications` (case sensitive).
|
|
|
|

|
|
|
|
5. Make sure you have a feed group with the type "Flat" and named `user` (case sensitive). You probably do, but if you don't, create one like you did with the notifications feed group.
|
|
|
|
6. Change your keys accordingly: (name of Stream key -> name of our application key):
|
|
|
|
```
|
|
Key -> STREAM_RAILS_KEY
|
|
Secret -> STREAM_RAILS_SECRET
|
|
"https://us-east-api.stream-io-api.com/api/v1.0/" -> STREAM_URL
|
|
```
|
|
|
|
7. Done!
|
|
|
|
# Pusher
|
|
|
|
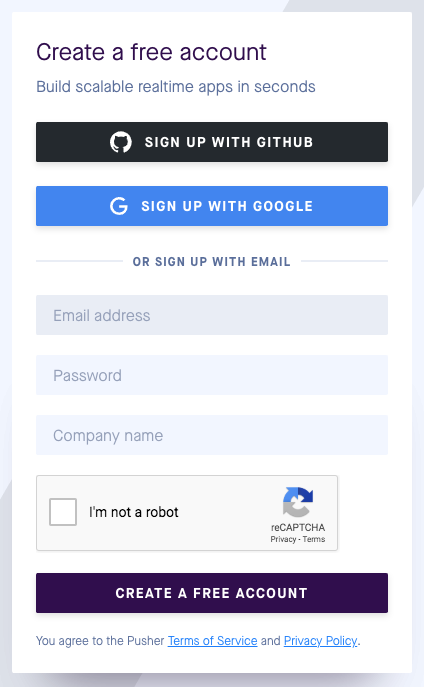
1. [Sign up for a free account with this link](https://dashboard.pusher.com/accounts/sign_up).
|
|
|
|
|
|
|
|
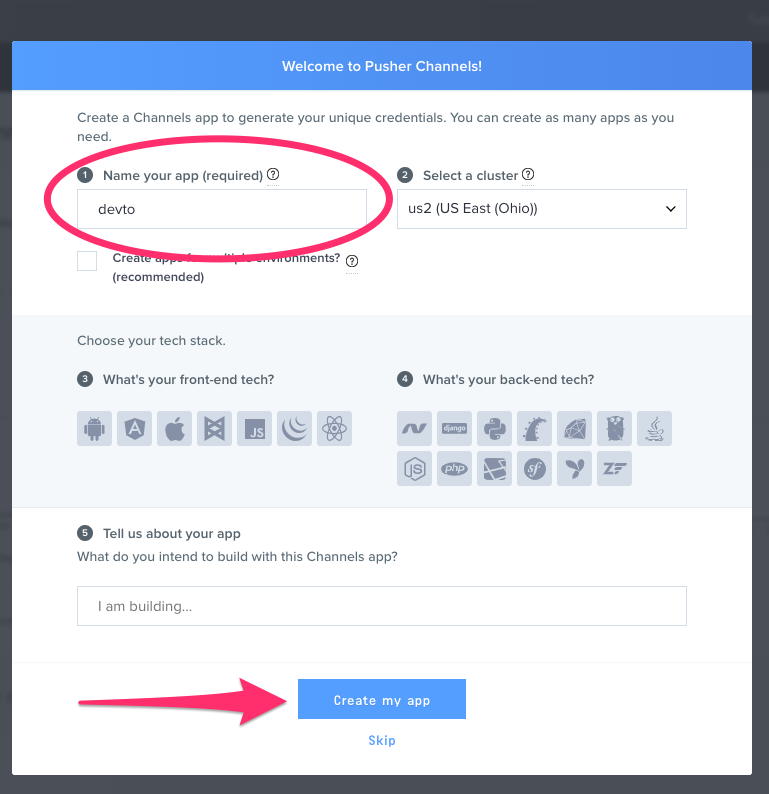
2. Once signed in, fill out the prompt to create a new Pusher Channels app. Only an app name is required.
|
|
|
|
|
|
|
|
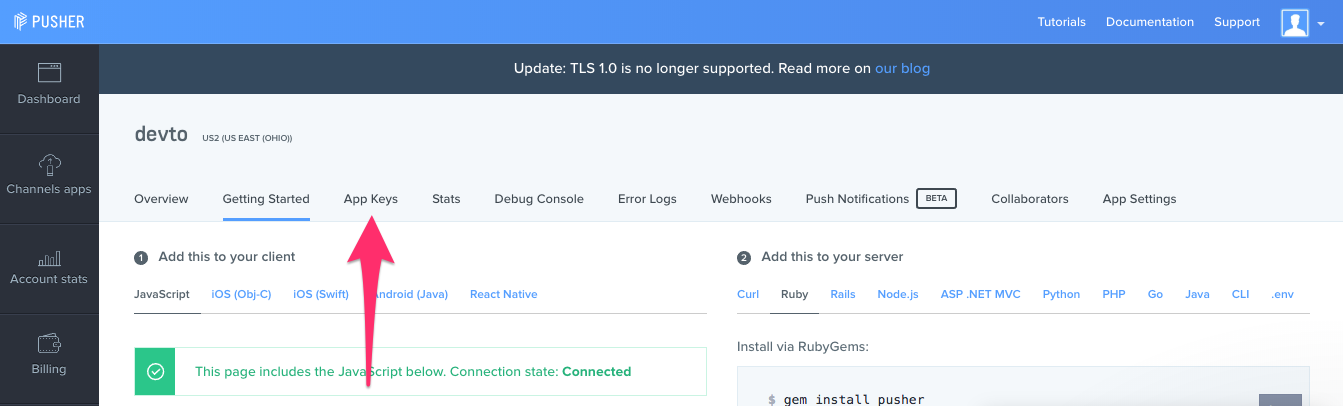
3. In your new Pusher Channels app, click the "App Keys" tab.
|
|
|
|
|
|
|
|
4. Change your keys accordingly (name of Pusher key -> name of our application key):
|
|
|
|
```
|
|
app_id -> PUSHER_APP_ID
|
|
key -> PUSHER_KEY
|
|
secret -> PUSHER_SECRET
|
|
cluster -> PUSHER_CLUSTER
|
|
```
|
|
|
|
5. Done!
|